Friday, May 30, 2014

32nd Edition Release Blog Hop...


Welcome to the 32nd Edition Release Blog Hop!
"My Birthday Month FREEBIE"


Since this was Emma's Birthday month, she wanted to do something EXTRA SPECIAL for this release! She is giving away this FUN new "Social Media Dies" to the FIRST 150 shoppers! YEP, you heard that right, this set will go to the FIRST 150 shoppers for FREE! You do NOT have to add it in your cart, Emma & her shipping crew will automatically include it in your pkg, ONLY to the first 150 shoppers! IF you happen to come through AFTER the 150th shopper, no worries because this will be available for sale! 

Emma, knows there will be questions on whether YOU made the first 150? 
AFTER the 150 shoppers come through, then you will see this set available for PURCHASE along w/the new release items! 


***BLOG HOP GIVEAWAY***

For our blog hop giveaway, Emma is giving away a $50 gift card to the "My Creative Time" store to ONE LUCKY winner! ALL you have to do is leave a comment on each of our blogs! You are NOT required to comment on EVERY SINGLE blog, but the more you comment on, the better chance you have for winning! VERY IMPORTANT, PLEASE leave a way for us to contact you w/your comment just in case "YOU" are the lucky winner! 


***SALE ALERT***

ALSO, DON'T FORGET our sale that is starting RIGHT NOW! Use the code: MAY2014 to receive 20% off your entire purchase! Sale ends on June 6th @ midnight PST

Welcome! You should have arrived here from Veronica.  

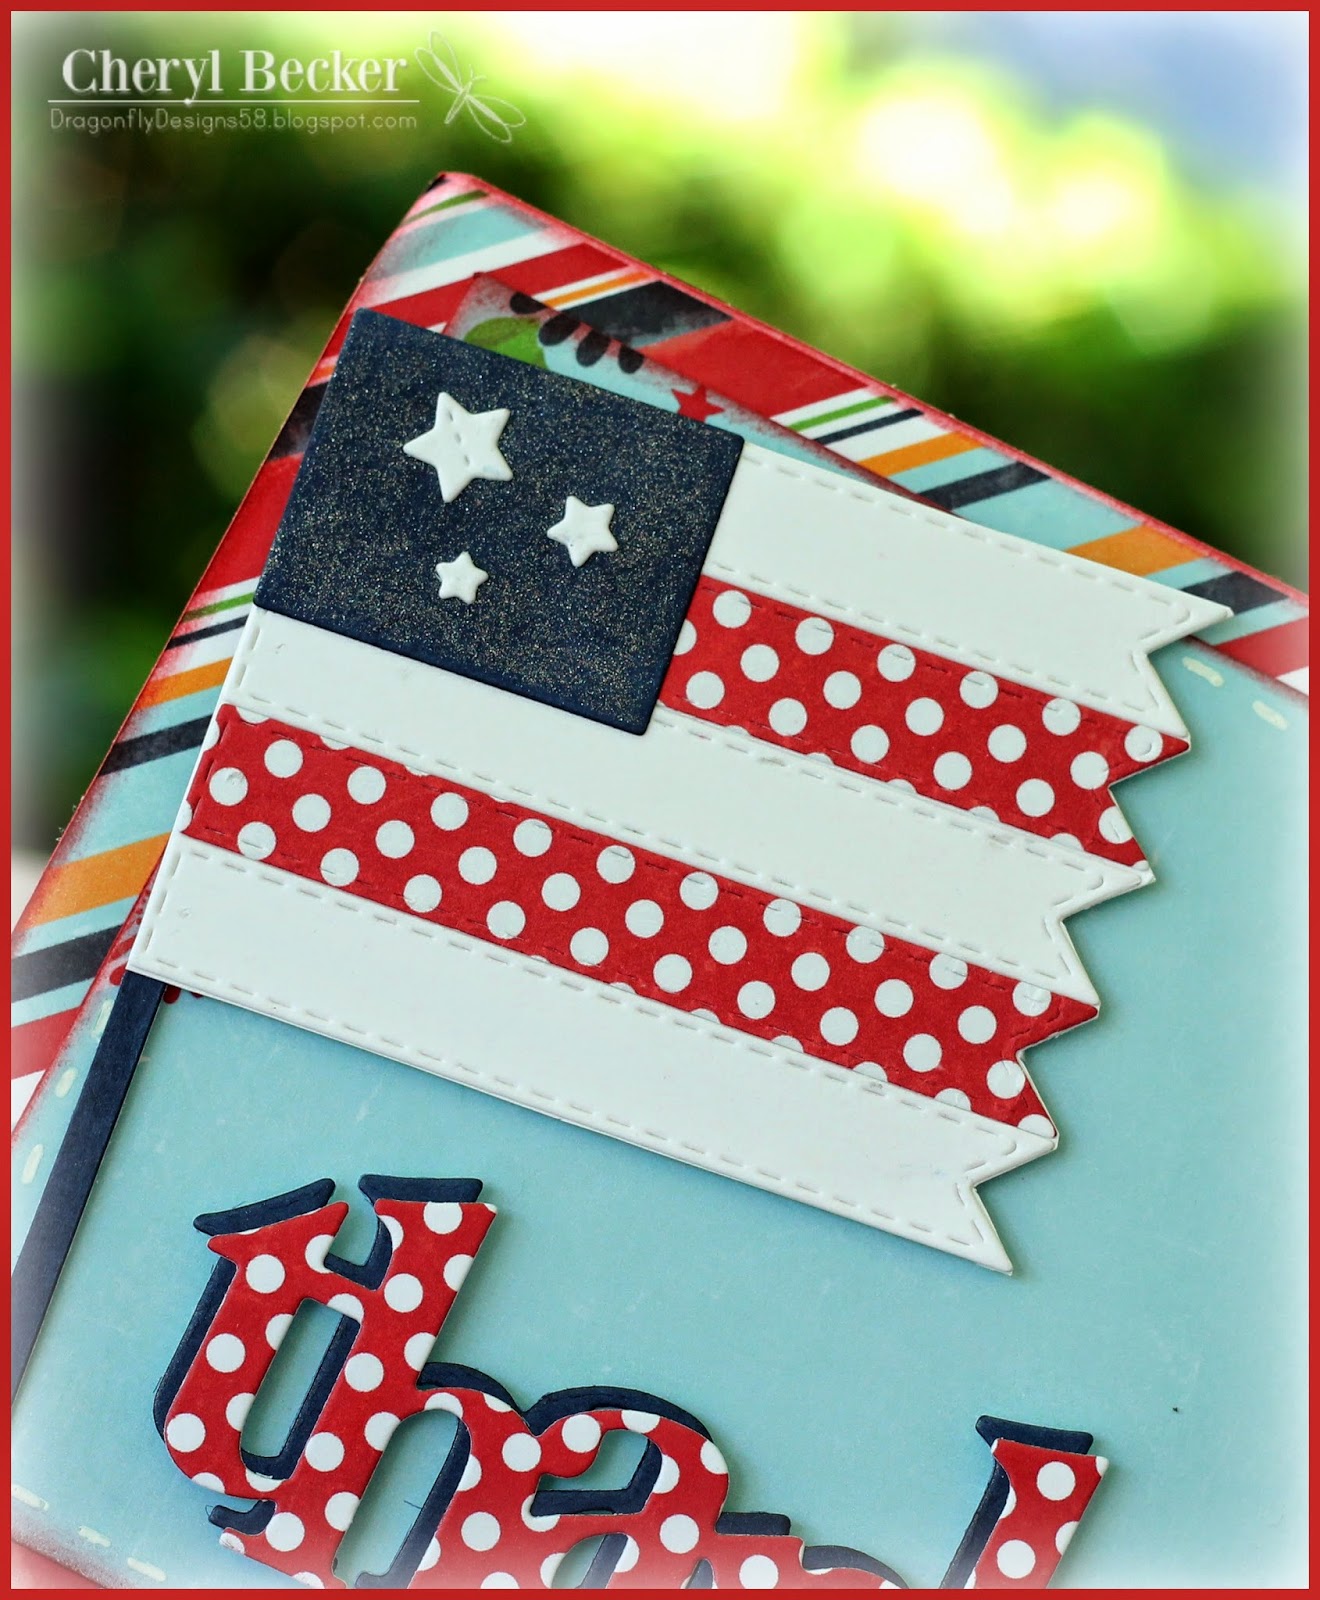
Yea!!! It's blog hop day! I have seen so many awesome things this week and it has been a lot of fun being back on Emma's team....even if only for this week. This team has put together some super cute stuff. And for me today, I have a shaker card to show you.
In case you couldn't tell by my blog name, I love dragonflies! Even have a tattoo of one on my foot! So, of course, I chose to use that die. Let's get to it.
 

I don't usually pat myself on the back, but I absolutely love how this card came out! So, first off...I played around with watercolors after taking an online card class.  I cut the dragonflies from that, and it sort of became the color theme for this card.

I cut the scalloped large circle first, then chose one of the other circles that would give me the size frame I wanted and cut that. Then I began to stamp a floral wreath all around, using shades of lilacs and greens. Had to see, but used Wink of Stella and Glossy Accents to add a bit of glitz and gloss to some of the flowers.


I added some gems to the bodies of the dragonflies.Aren't those sequins pretty?!


I cut a strip of paper wide enough for the sentiment I chose. Then I carefully figured out where on the scallop frame piece it should go to be straight, and then cut the edge with that die, so it perfectly matched the frame. I glued the left edge down and used a foam square on the other. Added a few tiny pearls.

I then cut a piece of acetate cut with the scalloped die and glued it right to the back or the card front. I then did two layers of foam tape to pop it up enough for the sequins to move freely. My trick to not get the sequins sticking to the sides of the foam tape is this. I put a small bit of baby powder on my work surface and carefully brush the sides of the foam tape, all the way around. This way the sequins won't stick and will shake freely. 

I cut a circle shaped card base using my Cameo slightly larger than the scalloped piece. I put a small pile of sequins down, and carefully set the frame piece over top, taking care to center it. Then pushed down good so the bound was tight. I finished if off with a bit of white gel pen accents.

Want to try this for yourself? Here's what you will need.

Pretty Butterflies & Dragonfly Dies ~ New Release
Live, Love, Laugh, And Be Happy ~ New Release
Bunch Of Fun Circle Dies ~ New Release

Have fun playing with whatever you decide to get from this release...it's all wonderful!!!


July 4th...

As Americans, we all love to celebrate our freedoms...and rightly so! We all love picnics, parades, and fireworks. So, in preparation for that, I've put together a goody box filled with some fun.

I used the number five box from Caddy Essentials over at My Scrap Chick. This is a really great set to have, perfect for giving any little gift or treat. I sized the box as big as it would fit on the mat. 
I printed out some fun digital paper and cut and assembled. 


So, here we have a "HOT" box of fun. Hot Sparklers, hot Pop-It's, Hot Tamales. And of course, with adult supervision only! Even the Hot Tamales...man them things are hot! Anyway, I used the stars from the flag in the Patriotic Family set. To get the open star, I layered one smaller one over a larger one and made a compound path. Then I sized one bigger and one smaller. As well, I cut a red, white and blue star. I accented them with some Stickles. Tied on a bit of twine and called it done.


When I printed my papers, I printed both sides, as when you fold up and assemble, if you don't use double sided paper, it will just be white. And that's ok, just not the look I wanted. I cut some panels of left over paper, and attached to the sides. The title was just made by selecting a font, and then creating a shadow layer for it. I used foam squares to add dimension to that and a few of the stars. 

I hope you like this and it gives you some inspiration to make something similar. Here is where you get what you need.


Don't wait too long, the holiday will soon be upon us! These would make fun take home gifts at your picnic for the holiday. The kids will love them! Fill with whatever you like, age appropriate of course.

Happy Crafting!


Thursday, May 29, 2014

Sneak Peak Day 4...

***Sneak Peek giveaway!***
We will be giving away the sets we are showcasing each day to ONE lucky winner! For example, the set we are showcasing on Wednesday, Emma will announce the winner of that on Thursday & the sets we are showcasing on Thursday, Emma will announce that winner on Friday in her video!
ALL you have to do is leave a comment on each of our blogs! You are NOT required to comment on EVERY SINGLE blog, but the more you comment on, the better chance you have for winning! VERY IMPORTANT, PLEASE leave a way for us to contact you w/your comment just in case "YOU" are the lucky winner! 
For EXTRA entries, you can spread the word about this release on Facebook, tweet about it OR even instagram it! #mycreativetime!
GOOD LUCK EVERYONE & let's start spreading the word!
Here we are at the last day of Sneak Peaks already. And you guessed it another card from me to show you. I cannot take credit for this idea though. I saw Jennifer McGuire do this with dies from Simon Says Stamp, and when I got the release from Emma, I knew right off I was going to try this. And I LOVE how it turned out! I hope you will like it too. And give it a try yourself.
 

First off....I love these bright papers! So summery! First off, cut and fold for an A2 sized card. Make a very faint pencil line in the center of the card front, from top to bottom. Line up the center of your butterfly dies on that pencil line, going vertical as well. Line up that pencil line with the bottom edge of your cutting plate so that part that hangs off won't cut. Here is a link to Jennifer's video to show you how.
Once you have run it through your die cutting machine you can score on that line then erase any of it that might show.

Once you have scored and folded it back on itself, you can cut your butterflies out of patterned paper and adhere. I added some tiny pearls to the bodies. I cut some very thin strips of the same papers and glued along the bottom edges.
I thought this sentiment just said all and nothing else was needed! This is a very simple card but one that will wow the recipient. I love how it came out and you could do this same thing with lots of dies.


I thought that writing on the front would really mess this up if someone wanted to leave it sit out. I created a panel for the back of the card that you could write your message on. Plenty of space and won't yuk up the front. 

So, there you have it...a simple, but very pretty card. Here's what you need to recreate it for yourself.

Pretty Butterflies & Dragonfly Dies ~ New Release
Speech Bubble Sentiments ~ New Release

Hope to see you for the blog hop tomorrow! Happy Crafting!


Wednesday, May 28, 2014

Refuse To Sink....

***Sneak Peek giveaway!***
We will be giving away the sets we are showcasing each day to ONE lucky winner! For example, the set we are showcasing on Wednesday, Emma will announce the winner of that on Thursday & the sets we are showcasing on Thursday, Emma will announce that winner on Friday in her video!
ALL you have to do is leave a comment on each of our blogs! You are NOT required to comment on EVERY SINGLE blog, but the more you comment on, the better chance you have for winning! VERY IMPORTANT, PLEASE leave a way for us to contact you w/your comment just in case "YOU" are the lucky winner! 
For EXTRA entries, you can spread the word about this release on Facebook, tweet about it OR even instagram it! #mycreativetime!
GOOD LUCK EVERYONE & let's start spreading the word! 
 
Hi and welcome back for day three of our Sneak Peaks for My Creative Time. I hope you have gotten your eye full of cuteness so far! Some amazing projects have been posted. I've seen lots I like, that's for sure! 
Here's what I have for you for today. Since cards are my fave thing to make, that's what I have again for today.


How cute are these nautical elements?! I LOVE them all...perfect for summer and I also have friends and family that boat and sail, so these are perfect for me! I love these anchors and wanted to just showcase them alone.


I wanted them to look like thick chipboard so I cut at least six of each, might be more, I don't remember. Then I glued them all together so they became nice and thick. I added with foam squares as you can see underneath. Brushed with Wink of Stella, doesn't show a whole but it's there!


Love these! Also love the texture of American Crafts card stock. I like how the background stamp really emphasizes that texture. You wouldn't get that on smooth cardstock.


I rubbed a bit of charcoal ink on the anchors to "grunge" them up a bit. After all, they can really look dirty sometimes! Tied on a bit of twine and added the sentiment. I layered in on the red and blue then used foam squares to add it to the card.

So, there you have it. Really simple and easy card. Here's what you'll need to make this one.

Anchors & Heart Dies ~ New Release
Stripey Background Stamp ~ New Release
Hey Sailor Stamp Set ~ New Release

See you back tomorrow for more Sneak Peaks! Happy Crafting!


Tuesday, May 27, 2014

Happy Fathers Day...

***Sneak Peek giveaway!***
We will be giving away the sets we are showcasing each day to ONE lucky winner! For example, the set we are showcasing on Wednesday, Emma will announce the winner of that on Thursday & the sets we are showcasing on Thursday, Emma will announce that winner on Friday in her video!
ALL you have to do is leave a comment on each of our blogs! You are NOT required to comment on EVERY SINGLE blog, but the more you comment on, the better chance you have for winning! VERY IMPORTANT, PLEASE leave a way for us to contact you w/your comment just in case "YOU" are the lucky winner! 
For EXTRA entries, you can spread the word about this release on Facebook, tweet about it OR even instagram it! #mycreativetime!
GOOD LUCK EVERYONE & let's start spreading the word!
 
Here it is... Sneak Peaks Day 2. Hope you liked everything you saw yesterday. Lots more super cute stuff today, for sure!

I chose images and dies to make a Fathers Day card. So much cute stuff in this release, it's hard to pick....I want to use it all! So...here's my card.

It is hard to tell and it was hard to get a pic without glare...but the opening is acetate to look like you're looking out the window of a goat and seeing a whale swimming by. It has a bit of depth to it.


For the screws on the port hole, I used glittery gold enamel dots. I like that added sparkle it gives. I also used the curved edge die from the Fun Stitched Dies to create a couple waves for the orca to swim in. I added some white clouds as well. 


I chose one of the sentiments out of the new Lost At Sea stamp/die set. My hubby loves orca whales...always has. Thought this would be nice for him....however, my son saw it and said I could mail it to him for Fathers Day...he's soon to be a new Dad! Anyway, I mounted it with foam tape. Then the entire front panel was mounted to the card base with foam tape as well.

So...here's what I used on this card.

Lost At Sea ~ New Release

So, there you go. My take on a few of the stuff in this stamp/die set. I know you will love it, too! Hope you got inspired, and happy crafting!  


Monday, May 26, 2014

You Are Courageous...

We will be giving away the sets we are showcasing each day to ONE lucky winner! For example, the set we are showcasing on Wednesday, Emma will announce the winner of that on Thursday & the sets we are showcasing on Thursday, Emma will announce that winner on Friday in her video!
ALL you have to do is leave a comment on each of our blogs! You are NOT required to comment on EVERY SINGLE blog, but the more you comment on, the better chance you have for winning! VERY IMPORTANT, PLEASE leave a way for us to contact you w/your comment just in case "YOU" are the lucky winner! 
For EXTRA entries, you can spread the word about this release on Facebook, tweet about it OR even instagram it! #mycreativetime!
GOOD LUCK EVERYONE & let's start spreading the word!
 How fun that I get to be back with the My Creative Time DT for this release! And what an awesome release it is! Emma has outdone herself again! 
For the first day of Sneak Peaks, I have a card to show you.


So, this card sort of morphed, lol. I started out by cutting the striped patterned paper with one of the tag dies, because I wanted that stitching on the edge. Then I decided I wanted another layer peeking out the bottom. At first I had it wider, then changed my mind. What I ended up doing was using the same tag die to cut the blue. And then, I changed my mind again and wanted it shorter, but liked the larger scallops of the Fun Stitched Edge Dies, so used that on both, and layered with foam squares. A woman's right to change her mind,lol! I then cut the Speech Bubble Die with the tiny dotted paper, and added that to the top.


Next, I used the same teal colored paper to cut "you are". Actually, I cut them six times, layering together using Zig Two Way glue, and put that patterned paper on the top. This makes it nice and thick, lick it's chip board. I wrapped a bit of twine around and tied in a bow. Stamped the sentiment and used my scissors to cut a flagged end. Used the Tim Holtz Tiny Attacher and stapled them together. I cut the orange patterned paper using the Stitched Capture Frame. I glued the scallop tag piece to that, and then glued all to the pink card base. I finished it off by adding a few enamel dots. And glued the sentiment lined up with the right edge. This is a smaller card...4 Bar, I think?...measuring 3.5 x 5. 

Here is what I used for this cute little card.

Speech Bubble Sentiments With Dies ~ New Release

Friday, May 23, 2014

Thankful...

Whipped up a card as I was thinking on this Memorial Day weekend. So very thankful for the service of our men and women who choose to serve and defend our country, so we can continue to enjoy the freedoms we often take for granted.

Used only dies for this card. Take a look.


I used the flag die that is in with the Chocolate Greetings Die set. I cut three in white and two in patterned paper. I glued them side by side and then trimmed out with scissors. I cut a square in navy and added three tiny stars. They come in the 4 x 4 Journal Die & More set.


I cut two larger stars from the 3 Star Stitched Die set and layered them in the corner. I brushed some Wink of Stella glitter on the navy pieces. Wasn't crazy how it shows in the pics, so much prettier in person :(


For the "thankful", I used a die from Paper Trey Ink. I cut two and offset them to create a shadow.

The layered pieces of patterned paper are from Lori Whitlock's Patriotic Picnic paper collection, available in digital format at Jessica Sprague.


Monday, May 19, 2014

Popsicle Time...

Ok, so my grand daughter loves popsicles!!! I mean, loves them! So, I made this little card for her. 
I took one of the phrases from My Scrap Chick and welded two together to create a card. I chose really fun, bright colors and then cut it all out and assembled.


Doesn't this just scream ice cream truck! My little grand babies know that sound and go running! I love this color pallet ~ just in case you didn't know by now ~ lol! Anyway, I created two of the back layer, mirrored one to the left and welded under the pink popsicle. Then it was a matter of picking papers and cutting all the layers. 


I inked the edges a bit and added some gel pen accents and a few pink pearls.


I tied a bow of twine and added it to the orange popsicle.


Also for the center section, inked edges, and added gel pen accents.


For the popsicles, I cut an extra of each color. I added them with some foam adhesive. You can see the other layers were added with some foam tape as well. I like the dimension it gives. 

This is not a big card. It is probably less than 3 inches tall and maybe 5 wide. I think it would be cute tied around a handful of  ice cream treats or tuck in some money for the ice cream truck. Lots of cute things you could do with this. Even invites for an ice cream social.

Here's where you can get your files.


Hope you found a bit of inspiration and have fun crafting!


Friday, May 9, 2014

Vroom Vroom...

A quick card this morning for My Scrap Chick. I looked back through older files and decided on this simple little card. I cut the layers from different papers and assembled the car. I also cut a very tiny oval for a head light and two very tiny rectangles for door handles. For the road, I just cut a black strip and used my white gel pen for the lines in the road.


I also pulled this super cute tree from my stash of MSC files. Cut from patterned paper and added a stitching line around the edge. 


For the sentiment I took one of the chat bubbles and added my text to the center, made sure to center it, and then selected for it to be "no cut". I only had the chat bubble to cut. I also created an offset layer to pop it up a bit. 


I pulled out a few wood accents from my stash. I colored them with a red Copic marker to match the car, brushed on some Wink of Stella and then coated it with Glossy Accents. Also added a bit of that to the head light, door handles, and tire centers. I also did a bit of white gel pen. I used vellum behind the windows.

So, that's it....simple today. Cards don't always have to be elaborate and detailed...esp for a guy! Keep it simple....you know the saying, lol. Anyway, here's where you can get these files. 

Car Album 
(Retired, but you could use any car)

So...I did not realize when I pulled this car out of my stash that it was not in the store any more. I'm so sorry about that. But, you could easily substitute any car you have, or vehicle of any sort really. Get creative, sometimes guy cards can be hard, hope this gives a bit of an idea. 
Happy Crafting!


Wednesday, May 7, 2014

Let's Go Fly A Kite....

I'm not sure why, but I've been on a kite kick this Spring! I just love kites, maybe it's the kid inside, but I want to kite flying! I want to let the grand babies experience it, too! So...I asked FleuretteBloom to design a kite and she came up with a super cute one! Here's what I did with it. Had a hard time keeping the babies off them, so I know will love this little display I made for them.


I made a little display of kites for the kiddos....to me kites scream SPRING! This file is so great! You can use the one with the four panels or the one with the solid background. And throw in some cute clouds with it! 


Here's the one I made for Karson...a bit more boyish colors. So bright and fun!


Here is Miss Aleida's kite. All pink and girly! If you noticed, I tied a bit of twine in bows and added to the kite tail. Every kite needs some cute twine, right?!

Here is a pic of the ones with the solid background.


I added a bit of twine on the orange kite and tied a string to it...that's how a real kite is with it's string coming down to the controller of the kite, lol. Added a touch of glitter to the tails too.


I'm so glad the babies like these. Since I have them every day, I like to have things made for them sometimes, and they can take them home! Love them babies! I chose a butterfly from Fleurette too, and added a couple of those. You must pick up this file....it's adorable!

So, here is where you go to get what you need! 


Why not make some of these to make your space feel like Spring! You could even do them plain white and let the kiddos decorate their own! Great idea, right? Happy Crafting!


Monday, May 5, 2014

Springtime Wreath...

Hey guys! I just got some new goodies from My Creative Time and had to make a wreath with these adorable stamps!

Here it is!


I couldn't stop! I love this new stamp set! I was a florist by trade growing up...my parents owned a flower shop...and I guess my eye for design and color came from that. I cherish that training now, but as a kid I hated to always have to go to work right after school! Anyway, I just kept stamping away till I got the look I was after. Then I cut some of the flower dies and added them, scattered around a bit. Finally, I used that adorable fun size bow die. But I only used the tail pieces. I layered two for the bow part and one for the tails...cut it apart. Scattered a few pearls around, and called it finished.

Not much more to say really...just a simple card but all the stamping makes it look more difficult. Easy peasy!

Here's what I used.


So there it is...super simple but very fresh and classy looking! And very thin for mailing. Get your hands of these...you will love them!!!