Friday, August 30, 2013

Blog hop...26th release...


 Get a look at this!!! Here's the brand new release!


BLOG HOP GIVEAWAY!
For our blog hop giveaway, we will have 2 winners! 
Winner #1 ~ will win a PRIZE PACKAGE from "Liz's Paper Loft Boutique" & a $50 to "My Creative Time's Store'! 

Winner #2 ~ will be our "Guest Designer" for our September Release! 
All you have to do is leave your comments on our blogs! You are NOT required to comment on ALL blogs, but the more you comment on, the better chances you have! 
GOOD LUCK! :)

I hope you are ready to see some amazing stuff!!! This is the best DT ever and I know you will get lots of great ideas to use these new products or new ways to use what you already have.
Here's what I made for you today. A simple card, but I think it's a fun one!


 Now...who wouldn't love a girls night out?! I know I would...and actually I think it's about time for one. Anyway, I used the Stitched Restroom Peeps Die and cut three of the ladies. I used dimensionals to attach to the tag die base. Love them! Then I cut three tiny strips of paper, each a bit shorter and glued to the tag right under the girls. Just a bit of interest to break up the elements a bit. For the stamp, I used the square piece that comes out when you cut the Stitched Mini Frame and Arrow die. I popped it up on dimensionals as well.


I love how this new stamp has a bit of a shadow line around the main words. It's those little touches that make Emma's stuff so special. For the bottom edge of the tag, I used glossy accents to attach my sequins. Such a cute look...love sequins! You can also see I did a simple sewing line around the mat layer under the tag. I also inked the edges a bit. The size of this card is 3x6. I'm having fun making some different sized cards lately...getting bored with A2! Plus, having the Envelope Punch Board, I can make about any size envelope I want and they will match my card! It is by We R Memory Keepers. A great tool to have!  

Here is the inside of my card. To make the bit at the top, I used one of the little decorative swirls and stamped them so they just touched at the sides and made a boxed area to stamp the invite. Then I simply used the stamp on the side to fill in all the details. A super cute way to invite your friends for any type of party or gathering. Inked the edges again and simply glued flat in place.

And a quick photo with the envelope I made with the Envelope Punch Board.


I hope you liked my card for you today. And I hope you are enjoying the blog hop. Amazing stuff....as usual!
Here is my list of what I used on this card. 
Fright Night Stamp Set ~ New Release
Girls Night Out Stamp Set ~ New Release
Let's Celebrate ~ New Release 

So...I just can't stop!!! I came up with a second card for you. I LOVE how this came out...hope you do too!


Isn't it cute!!! I love how this die looks like one of those room divider screens. I "hung" the dress on the door and set her purse at the bottom. 


To make the purse, I stamped the image and then fussy cut it by hand. Not easy! Then I cut a second waist band like on the dress, turned it around, glued it on the bottom of the purse. It's not a perfect fit, so the bits of the stamp that showed, I just trimmed off. I also cut to label dies and cut the black one in half. I trimmed off what showed and glued to each end of the top piece. I like that look of layering. I ran the blue piece through with an embossing folder for texture. Tied a bow and put dimensionals under for added depth. I also put on some shiny black gems. I hope you like this as much as I did! 

Here's what I used.

Girls Night Out Dies ~ New Release
Photobooth Die ~ New Release
 
 Here is the next stop on the hop....have fun!

Thursday, August 29, 2013

I Love Coffee...

BLOG HOP GIVEAWAY!
For our blog hop giveaway, we will have 2 winners! 
Winner #1 ~ will win a PRIZE PACKAGE from "Liz's Paper Loft Boutique" & a $50 to "My Creative Time's Store'! 

Winner #2 ~ will be our "Guest Designer" for our September Release! 
All you have to do is leave your comments on our blogs! You are NOT required to comment on ALL blogs, but the more you comment on, the better chances you have! 

GOOD LUCK! :)
PRE-ORDER DAY!!!! 
The August 26th Edition stamps & dies are available for PRE-ORDER right now! Please enter the code: AUGUST2013 to receive 20% off your ENTIRE ORDER! This sale ends Friday, Sept. 6 at midnight, PST.  Start shopping HERE
HAPPY SHOPPING!

Have you fallen totally in love with this release yet?! If not, today might just push you over...not to mention the blog hop tomorrow! Here's what I made for you today. I hope you like!


This What A View Die is amazing!!! Can you imagine all you can do with this?! I found a card base in my Silhouette store that I liked and sized it so the die cut would fit nicely with a border around it showing just a bit.  I cut the die twice in different colors and saved the tiny squares and put them back in after stamping "coffee". Then I used dimensional adhesive to attach to the rest of the card base.


I stamped the coffee cup on white and on patterned paper and cut to do some paper piecing. I also cut the Teeny Tag Die and found an "I" and a "heart" that I liked and stamped it. Attached with dimensionals as well. I tried to get a shot that let you see that I went back over the stamping with a clear gel pen to get that glossy look of the old time plastic label tape. I think it worked great. And of course, I had to add some white gel pen accents.


Here is the sentiment I stamped on the inside of my card. And trust me....it's true! So, there it is...my card for today. I hope in some way I've given you a bit of inspiration. Mix up your new with your old, they all work together so well! That's the thing I love, Emma designs new things that will work with your old....so you can use them all!

Here's my list if you're interested.

What A View! Die ~ New Release

So, that's it....that's all I used on this card. Have fun checking out all the other DT projects, and don't forget, today you can PRE-ORDER!!!


Wednesday, August 28, 2013

Out of this world...

Sneak Peek giveaway!
We will be giving away the set we are showcasing each day to ONE lucky winner! For example, the set we are showcasing on Monday, we will announce the winner of that on Tuesday & so on......

ALL you have to do is leave a comment on each of our blogs! You are NOT required to comment on EVERY SINGLE blog, but the more you comment on, the better chance you have for winning! 
For EXTRA entries, you can spread the word about this release on Facebook, tweet about it OR even instagram it! #mycreativetime!
GOOD LUCK EVERYONE & let's start spreading the word! ;)

Here we are at day 3 already! Aren't you loving all the cool stuff?! I certainly am! Here's my card for today. Another 3x6 card...sorta liking these little things, lol...


I have had this pad of paper for like forever...and seldom used it. So, today I got it out and made a little boy card. I cut the paper to my advantage, getting this little guy at the bottom with the planets near the top. I used the new Stitched Party Dies banner die and cut it from several of the papers to get different patterns on each flag. I also cut the Scallop & Stitched Circle Dies and stamped my images. I added it with dimensional adhesive. 


I also cut the flag die from the Vintage Label Die set. I stamped it closer to one end and cut off the other end. Attached with dimensional adhesive. As you can see, I did a bit of zigzag stitching with my sewing machine. I like the added interest and don't do it often enough. For the circle sentiment, I taped off the word "Valentine" as I did not want that. That left me a nice spot for the spaceship.  
I glued on a few silver sequins to give the sparkle of stars. So, there you have it. Below is a list of what I used on this card.

Stitched Party Dies ~ New Release

I hope you like my card for you today, and I hope you are having a good time seeing all the new stuff. Have fun crafting!


Tuesday, August 27, 2013

Happy Hour...

Sneak Peek giveaway!
We will be giving away the set we are showcasing each day to ONE lucky winner! For example, the set we are showcasing on Monday, we will announce the winner of that on Tuesday & so on......

ALL you have to do is leave a comment on each of our blogs! You are NOT required to comment on EVERY SINGLE blog, but the more you comment on, the better chance you have for winning! 
For EXTRA entries, you can spread the word about this release on Facebook, tweet about it OR even instagram it! #mycreativetime!
GOOD LUCK EVERYONE & let's start spreading the word! ;)
 Are you loving the Sneak Peeks so far? Awesome stuff, right?! This is the best Design Team with the best creator ever! Thanks for the awesome stuff, Emma!

Here's my project for you today. I am showcasing the stamp set called "Some Days Simply Require...". What a fun stamp set! This will be used a lot, I do believe...lol!


Fun, right?! For this card I pulled out some older stuff to use with these awesome new stamps. I love this color pallet as well. So, a fun way to invite the girls out for a night on the town. You could hit up for Happy Hour, then head out to the movies. I love the ticket dies and it works perfectly for a card like this. And you can't beat the tag dies for a foundation to build on...love those!


I also used the flag die that is in the set called Chocolate Greetings. I popped it up and hand cut a shadow layer to match. I did the same thing to create a layer under the large tag die.  And LOVE the sequins! They add just that little fun pop of dimension and color to any project.  The size on this card is 3x6 inches. It's fun to use the Envelope Punch Board from We R Memory Keepers. You can make any size you need. It's to make all size cards, not always 5.5x4.25!

Here's the inside of the card.


I had an idea to cross out "glass" and replace it with "bottle". Let's face it, some days are just like that! However, drinking a whole bottle might not be the greatest idea! Anyhow, super cute sentiments in this set. I'm sure you'll find lots of ways to use them.

So, here's the list of sets I used for this card.

Some Days Simply Require ~ New Release

Have fun checking out all the new products...and then have fun shopping....and then have fun creating!


Monday, August 26, 2013

A little treat for you...

Sneak Peek giveaway!
We will be giving away the set we are showcasing each day to ONE lucky winner! For example, the set we are showcasing on Monday, we will announce the winner of that on Tuesday & so on......

ALL you have to do is leave a comment on each of our blogs! You are NOT required to comment on EVERY SINGLE blog, but the more you comment on, the better chance you have for winning! 
For EXTRA entries, you can spread the word about this release on Facebook, tweet about it OR even instagram it! #mycreativetime!
GOOD LUCK EVERYONE & let's start spreading the word! ;)
Who doesn't love Sneak Peeks?! I know I do. And I also know that you will see some amazing projects this week from the design team and Miss Emma! I tell you, that come up with some awesome stuff!
So, here's what I made for you today. A cute little box to put some goodies in for your favorite little Trick or Treater.  And I filled it with that amazing Candy Corn!


This cute little box is a file from SVGCuts. I love this little thing! And actually, in your cutting program, you could break the image apart, remove the pumpkin face, and replace it with something else, making this a little treat box you could use for any occasion. I put a strip of Scor Tape around the bottom edge and wrapped it with twine. I like how it finished off that bottom edge a bit.


 I used one of Emma's banner dies to stamp the sentiment on. I used dimensional adhesive to adhere to the lid. I ran a ribbon up through the precut holes and then through a button. Tied a bit of twine to finish off the look.


And who doesn't love Candy Corn! Just filled a little bag I had and tied it off with ribbon. I hope you like this little treat box and will make some of your own. Especially since you could custom tailor it for any occasion.

Here's what I used on this project.

Fright Night Stamp Set ~ New Release

 So...I came up with one other idea real quick. Stamps and dies don't only have to be used on a card or layout or decor piece. I had an idea to make a cute hair bow for my grand daughter for Halloween season. I used black and orange tulle and gather it all together and wrapped a wire around to secure. Previously, I had used the new little ghost die and cut about 6-7 pieces. I glued one to the other until it was a nice sturdy thickness, like chipboard. On the top, I smeared white glue and sprinkled it with Martha Stewart glitter. I used black Stickles for the eyes. I then stamped the word "Boo" on black and embossed with white embossing powder. I added the word with a dimensional adhesive, and used hot glue along with it. Wasn't wanting to stick to the glitter. Then I hot glued that to the center of the tulle. The whole piece I then glued on to one of Miss Aleida's stretchy hair bands. I got a good pic of the headband, but not so good on her head. I will post the one I got though...even though it's not the greatest photo. If I have time I'll try again. So.....ready to see?! I like it and I hope you do too. Maybe you can think of your own ways to use products other that paper crafting.


 Here's what I used to create this hair bow.

Cutie Patootie Ghost Die ~ New Release
Fright Night Stamp Set ~ New Release

So...there you have it, my little treat box showcasing the new stamp set called Fright Night, and my Cutie Patootie Ghost hair bow.  Have fun checking out all the amazing projects the other design team members have for you. 


Tuesday, August 13, 2013

Inspire Me Tuesday...

Today we are doing projects from something that inspired us. Well....I got a new toy...that was my inspiration...lol! Wanna see? I'm super excited about it, been wanting one for awhile now and finally got it! Here's my new Canon Selphy cp900!


Isn't it cute?! Now I can print all my cell pics so easily...and all my Instagram pics! I got it from HSN. This is what inspired me to print some of my latest cell pics for my Project Life book. So let's get going.

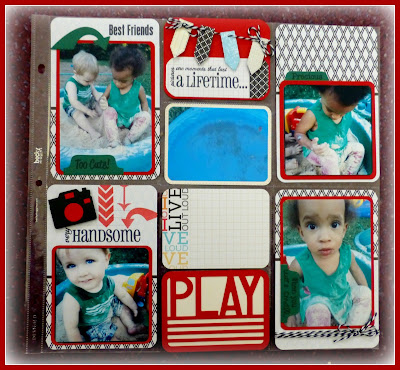
Here is the layout I did using pics of the grandbabies playing in the backyard. 

  
I really like how true the colors are. Very nice quality...and so easy! You see the blue square? Well, all that in the bottom of their pool is sand!!! Yes, they got in the pool, into the sandbox, back into the pool...and on and on! What a mess! But, they had a blast and that's all that matters. I used several MCT dies and stamps. The papers are from my PL system. 


I'm telling you, the sand was plastered!!! Sand everywhere you can imagine...and yes they ate some too! Look at Karson, those eyes of his melt my heart! Love the camera die and those arrow stamps! See the little tab die? So perfect! The "PLAY" card is from the Silhouette store.


And, not to be outdone, is Aleida! She loves her sandbox! See the Teeny Tag dies at the top? Made a banner using them. I left plenty of spots to add my journaling later. Emma's dies for doing PL layouts are great! So easy to use for everything! And I wasn't much of a scrapper before she invited me to be a part of her DT. Now I'm beginning to love it!

So, here's what I used. Visit Emma's store and start collecting her things so you can create amazing things!

It's All About You Stamp Set
Camera Shy Stamp Set
Tab Notes Stamp Set
Things I Love Stamp Set
You Are Here Stamp Set

So...I think that's it! Pull out what you have and work on preserving life's memories. I'm glad I'm at least doing something for my grandkids, cause I didn't do my own, lol! Happy crafting!


Wednesday, August 7, 2013

Surprise...

Today at My Creative Time we are doing Favorite Stamp Of The Month projects. This month the stamp sets we are showcasing are Paper Princess and Polka Dot Surprise. I used both on my card. Love using some of the older sets...there are so many great stamps in them! Don't forget your older stuff when a new release comes out...THEY ARE ALL AMAZING!


I must say...this is probably my fave color combo ever! I LOVE them. Any way, I found this martini cut file in the Silhouette store...so cute! I assembled it...inked edges a bit...and popped it up on the tag I cut using one of the Tag Dies. I manipulated the die on the paper so I could cut it a tad longer. If you leave one edge hang off the cutting plate so it doesn't cut, run it through. Then for the second cut, you scoot the die down the paper a bit. Now leave the other end hang off the plate and run it through again. This technique allows you to lengthen the cut of the die you are using.


I stamped the "Surprise" and attached it flat down on the tag...no dimensionals. Then I stamped the other sentiment on the Stitched Oval Die. The martini glass is also added with dimensionals. Then I put dimensional adhesive on the back of the tag and attached to the card front. I wrapped some hemp around the patterned background before popping it up on the card base. And tell me....who doesn't love the look of sequins?!!! Thanks to Navy Wife Nikki...I'm getting hooked on them as well! 


So, there you have it...here's what I used on this project.

Polka Dot "Surprise" Stamp Set

So...head over to My Creative Time and get these stamp sets while they are on sale. This price is good until SUNDAY, AUG 11th @ midnight PST.

I hope you like my little card today...I think it looks like fun to me! Join in with us if you have these stamp sets, and let us see what you come up with. You can post your pics on My Creative Time Facebook page. Happy Crafting!


Thursday, August 1, 2013

Thrifty Thursday...

Today is a segment called Thrifty Thursday. And basically it is using up scraps, re-purposing something, or just using up what you have. So, I picked out a bunch of small cuts of patterned paper I had that I could use up. This is the card I came up with.


 I used the hot air balloon die and started off cutting one full one. Then, for the rest...I cut them, but then cut the basket part off. Leaving only the balloon. Then, I scored them in half and folded. I glued them to each other, making a fan affect. Then I glued that piece to the first cut that still had the basket attached. I tied a little twine bow on it. 


Another view of the balloon. Obviously, this is a tie on or hand delivered card!


I also cut the cartoon clouds and one of the tag dies. Each layer is attached with dimensional adhesives. I also ran the top red layer through the Big Shot using an embossing folder. Added it with dimensionals as well.


The sentiment is stamped on a cut made with the Just Simply Live set. I layered it on a simple rectangle and added it with dimensionals. Glued on a couple sequins as well. 

So...you can do a lot with those small bits of paper left from a larger project. Don't toss them out, use them up! Here's a list of the things I used.