Monday, April 22, 2013

You're 100% Awesome....

Played around a bit yesterday with my Cricut cartridges and Cricut Craftroom. At least now that my Gypsy is synced I can more easily play with all my cartridges. I do have a lot that I still like and am not ready to get rid of them. 
Today I played with Teddy Bear Parade...such cuties!
My stamps are from My Creative Time and Peachy Keen.


Used various scraps of paper left over from other projects. Tied a cheater bow, added some Stickles, and found two bright pink gems. Did some white gel pen dash lines and called it done.


Sunday, April 21, 2013

Don't forget...

I have a reminder book for birthdays and anniversaries and when Emma released this new die and stamp set in this latest release, I new I wanted to make another...maybe for a gift. 
This is what I came up with. I hope you like it.


I cut six pieces of chipboard, and twelve pieces of ivory cardstock from Paper Trey Ink...it's nice and thick! Then I stamped each of the twelve with the new Journal It stamp set. I glued each of the stamped pieces to the front and back of the chipboard piece. I then used my Cinch to punch the holes at the top. I added the O-wire and crimped it closed.


Here is good look at the thickness of the book. I love how this turned out!


I added some of the 3D flowers using the die to cut them. I stamped them with the scipt stamp, inked the edges with distress ink, and then added some chunky glitter. Chose this sentiment cause isn't that what we are doing? Remembering important dates? I thought it fit well.


I also cut like four of each of these charms and glued them all together for good thickness. I inked them up and tied with some twine to one of the rings. I also added a piece of lace paper cut using a SVGCuts file for Battenburg Lace...love those lace files!


Here is a look at the inside pages. Same is on the backside. Simply check the month, then on the right, add a name and their birth date or anniversary date. How cute is this way to remember. Stand it up on your desk and you have a quick visual for when cards need to go in the mail. I might make several of these to give for Christmas Stocking Stuffers.

So...here's what you will need to re-create this.


There you have it....all the sets I used to make this adorable little book. Get out some of your supplies and pick what you have that would work with this. It's fun to make gift items and not just cards. Who wouldn't love to have one of these!?!? Happy Crafting!


Friday, April 19, 2013

Call me....


***BLOG HOP GIVEWAY ALERT***

For our Blog hop giveaway, there will be 2 winners chosen from ALL the comments combined!  Both winners will win a $25 Gift Card to my store!  All you have to do is leave a comment here along w/the rest of the design team's blogs AND also leave a way for us to contact you!  Emma will use random.org to pick the lucky winners!  All you have to do is leave a comment on all blogs in this hop for more chances to win! The deadline is Sunday, April 21st at midnight! I will announce winners on my blog on Tues, April 23rd!  EASY PEASY!!! GOOD LUCK!:)

At last the day has come for you to hop with us and to see the entire new release! I am so excited for you all to see what we have been enjoying for a week or so now. It is fantastic and I know you will love it all!

I chose to make a VERY simple and basic card. No embellishments, no frills, just showing the stamp in it's simplest form. I hope you like it.


I told you it was simple! Sometimes CAS ~ Clean And Simple cards are all that's needed. Let your stamps speak to you. I really felt like this was all that was needed....so I just stopped. Everything in me wanted to embellish and add more to it. Believe me, it was hard to walk away....lol! The one thing I did do though, was use my black glaze pen and colored all the black. It made it a deep, dark black and gave it a gloss as well. That's it, that's all I did.


So, here's what I used on this card.

You Are Here Stamp Set ~ New


Now, on to the blog hop. Be sure to leave your comments for a chance to win the give away Miss Emma has. I am certain you will LOVE everything the design team has for you. 


Cheryl ~Me


Glora

 Kim
Liz

Thursday, April 18, 2013

So Thoughtful....


Sneak Peek Giveaway Time! 
With all of our Sneak Peek weeks, Emma likes to do some FUN giveaways!
 We would like to announce a winner everyday day, so this is what you have to do to qualify:   All you have to do is leave comments on our blogs! You do NOT have to comment on every blog, BUT if you do, you will just have more chances to win! The thing we are switching up this time, Emma will be picking a winner that night & announcing the winner the next morning! Example: for Monday's sneak, leave your comments here & share on facebook, then Emma will annouce the winner (for Monday) Tuesday morning! That means a winner will be anounced every day during sneaks! 

 ***SPREAD THE WORD TO THE WORLD ON FACEBOOK about this release & whatever connections you may have! Let us know on "My Creative Time's" FB page here http://www.facebook.com/#!/pages/My-Creative-Time/364568506334 that you did so! OR you can just tag me in your post!

 GOOD LUCK!
 Log onto to your facebook now & let start spreading word!;)

So, here we are at the last day of  Sneak Peaks for this release. It has been so fun playing with all the new stuff. I hope you have enjoyed seeing all the great projects the design team has made. I know, I have! 
For today, I have made a card for you. The papers I used are from Teresa Collins, He Said, She Said ~ Girl 6x6 pad. I love the softness of all the patterns in this pad. So pretty!
 So, here's my card.


I love how all these colors and papers layered together so nicely. I'm happy with how this turned out. So, I used the Stitched Journaling Die and cut another paper 1/4 inch smaller ~ 3 3/4 x 2 3/4 inches. I rounded the corners and layered on the stitched journaling die piece


 I also used the Stitched Flower Die. I love this flower! The Stitched Oval Die was used to stamp my sentiment. I added some die cut butterflies, a bit of hemp, and some brads.  Easy as that....but oh so pretty!

So, here's the list of sets I used.

Stitched Journaling Die ~ New

So there you have it. Be sure to check out all the other projects the design team has made. Have fun crafting!


Wednesday, April 17, 2013


Sneak Peek Giveaway Time! 
With all of our Sneak Peek weeks, Emma likes to do some FUN giveaways!
 We would like to announce a winner everyday day, so this is what you have to do to qualify:   All you have to do is leave comments on our blogs! You do NOT have to comment on every blog, BUT if you do, you will just have more chances to win! The thing we are switching up this time, Emma will be picking a winner that night & announcing the winner the next morning! Example: for Monday's sneak, leave your comments here & share on facebook, then Emma will annouce the winner (for Monday) Tuesday morning! That means a winner will be anounced every day during sneaks! 

 ***SPREAD THE WORD TO THE WORLD ON FACEBOOK about this release & whatever connections you may have! Let us know on "My Creative Time's" FB page here http://www.facebook.com/#!/pages/My-Creative-Time/364568506334 that you did so! OR you can just tag me in your post!

 GOOD LUCK!
 Log onto to your facebook now & let start spreading word!;)

 Here we are again for another Sneak Peak. And once again I have a card to share with you. I hope you like it. I am having so much fun with this release!

Here is my card.


I used a file from the Silhouette store for this card base. I like belly band cards and don't think to make them enough. Anyway, I cut the belly band and then added a thin strip of contrasting paper to go over it...it looked too plain. I then cut the frame out using the die, layered it on another piece of blue, adding just enough extra for my white gel pen. Then I rounded the corners. I popped up the frame element with dimensional adhesive. 


I cut out the arrow in the same pink cardstock and covered it with Stickles. Then I outlined the frame with it as well. Then I found some pearls in my stash and added three to each opposite corners. I get tired of the same old style card and this was nice for a change of pace. 

So, here's the list of ingredients.

Stitched Mini Frame With Arrow ~ New
It's All About You Stamp Set ~ New

 If you're tired of  the same style card...change it up a bit. Do some gatefold, or shaped cards. Get out of the rut and have fun! Happy Crafting everyone!


Tuesday, April 16, 2013

It's raining, it's pouring....


Sneak Peek Giveaway Time!
 With all of our Sneak Peek weeks, Emma likes to do some FUN giveaways!
 We would like to announce a winner everyday day, so this is what you have to do to qualify:   All you have to do is leave comments on our blogs! You do NOT have to comment on every blog, BUT if you do, you will just have more chances to win! The thing we are switching up this time, Emma will be picking a winner that night & announcing the winner the next morning! Example: for Monday's sneak, leave your comments here & share on facebook, then Emma will annouce the winner (for Monday) Tuesday morning! That means a winner will be anounced every day during sneaks! 

 ***SPREAD THE WORD TO THE WORLD ON FACEBOOK about this release & whatever connections you may have! Let us know on "My Creative Time's" FB page here http://www.facebook.com/#!/pages/My-Creative-Time/364568506334 that you did so! OR you can just tag me in your post!

 GOOD LUCK!
 Log onto to your facebook now & let start spreading word!;)

This is day two of the new release over at My Creative Time. I am soooo totally loving this release! So many VERY usable dies for cards, 3D projects, and def great for layouts!

So, here's what I made for you today.


LOVE, LOVE, LOVE this release! So much adorable stuff, and I can't wait to play with it all. I got the file for this card in the Silhouette store. I really like these easel style cards. I used the Stitched Postage Frame Die as a backdrop for these adorable boots and super cute umbrella. So easy to whip these out...I plan to have several cut, to use when I want them, then I don't have to cute one each time.


I used one of the  background stamps with Versamark ink and embossed with white embossing powder. Love them polka dots! I stamped the rain drops for this stamp set and then added to Stickles for a bit of glitter. Also wrapped some twine around and tied a bow.


How cute is this umbrella?! I'm loving that thing. And the stamp goes perfectly with the elements. I stamped it on one of the clouds from another set. I cut three...one larger and two smaller. Then I popped up the stamped one using dimensional adhesives.

So...here's what I used for this project.

I'm Here For You Rain Or Shine ~ New Release
Stitched Boot Dies ~ New Release

Stay tuned....cause there's a bunch more sure cute stuff coming your way! This is a packed full release and each and ever item is ADORABLE!!! Happy Crafting!


Monday, April 15, 2013

This little light of mine....

Sneak Peek Giveaway Time!
 With all of our Sneak Peek weeks, Emma likes to do some FUN giveaways!
 We would like to announce a winner everyday day, so this is what you have to do to qualify:   All you have to do is leave comments on our blogs! You do NOT have to comment on every blog, BUT if you do, you will just have more chances to win! The thing we are switching up this time, Emma will be picking a winner that night & announcing the winner the next morning! Example: for Monday's sneak, leave your comments here & share on facebook, then Emma will announce the winner (for Monday) Tuesday morning! That means a winner will be anounced every day during sneaks! 
 ***SPREAD THE WORD TO THE WORLD ON FACEBOOK about this release & whatever connections you may have! Let us know on "My Creative Time's" FB page here http://www.facebook.com/#!/pages/My-Creative-Time/364568506334 that you did so! OR you can just tag me in your post!
 GOOD LUCK!

It's time again for some super cute Sneaky Peaks! Love new release time! Anyway, here is what I made for you today. 

 
I made this cute little night light lamp.  The file is from SVGCuts and I love this thing! So easy to put together. I broke the file apart so the sides were free of any cut outs. I then used one of MCT's button dies...the larger round button. I cut them out randomly on three sides of the lamp shade. Then I added the yellow buttons...using the smaller button die....and glued them onto the vellum inside the larger cut out circles. 

I added a few of the butterflies using another die. I put them in areas between buttons, where there was a bare spot. 

I used Scor Tape and made a ruffle of some ribbon from my stash and added it around the bottom and the top. I like the ruffly edge!

I used one of the larger buttons cut out from the shade, added a bit of hemp cording, and glued it to the base of the lamp. I then cut a doily from the same pattered paper and clue it to the bottom of the base, like it's sitting on a real doily. 

Here it is lit up. Sorta hard to get a good pic, sorry. 


It uses one of the battery operated tea lights you can find in the craft stores.
 DON'T USE A REAL CANDLE!


I used a die from the Vintage Label Dies for the sentiment. I curved it a bit at the ends and in the center. Then just glued it on. 

I hope you like the little lamp I made. I'm going to let Miss Aleida have it in her room. I want  her to grow up knowing she has a very special light inside of her....God's Light....and to always let it shine for the world to see. And to never be ashamed of it!

Here's what I used for this project. 

You're Brilliant ~ New Release
SVGCuts ~ Lamp

Pick up this file and cut one of your own. A super cute gift to give and would be greatly appreciated! Then pull out your My Creative Time supplies and decorate away. Thanks for coming by and happy crafting!


Saturday, April 13, 2013

"GIVEAWAY ALERT"
Would you like to win one of the AMAZING new sets from this release? All you have to do is guess what is the new item on our projects that we are ALL featuring today & leave a comment w/your answer! Winner will be announced on our "official" first day of sneak peeks on Monday, April 15! You have up to Saturday, April 13th at midnight to leave your comments! Good luck! ;)


I love rosettes! I love making them, I love embellishing them, I love how sturdy they are...I love everything about them! Often I make large ones for my front door and decorate them for the season or occasion. So, for today's peak, I made a small one. I used the Easter pic of my precious Aleida...she looked so pretty! I'm sure if you search YouTube you will find many videos on how to make these. Gather up your supplies and make one for yourself or a gift for someone. 
Here's the line up for our hop today. Check out all the great things the design team has made. Don't forget to leave your guess of what's new in your comment for a chance to win.

Cheryl ~ Me


Wednesday, April 3, 2013

Yum...

Still enjoying the digi papers I printed off by Designs by Dana from Jessica Sprague. Love the soft feel of sherbet colors....so Springy! Anyway, I made a simple birthday card. I always need birthday cards, don't you?


Now, doesn't this just scream Spring or Summer? I layered up several of the pattern papers and put it all on a base of dark brown cardstock from Paper Trey Ink. I love the weight of their cardstock. It's the best for card bases.


I love this ice cream cone die from MCT and haven't used it in quite a while. It was time to get it out again and use it with these papers that so look like ice cream. I popped up just the cone on a bit of the dark brown cardstock and cut by hand around it to make a simple mat. I think it worked out well.


And this about sums up what I think about sherbet and or sorbets! I love them!!! I used the letter dies to cut these and then cut additional with the brown...to give a shadow appearance. 


And the ticket die....oh how I love this ticket die! I stamped a simple sentiment that would be suitable for a birthday or really for any special day. I layered it up using foam dimensionals.

I used my white gel pen around the edge of the card for some added interest. I put the ribbon on the patterned paper before adding it to the card base. Tied a simple piece of ribbon for a little bow.

So, here's what I used.


Hope you like my card. Get out your supplies and have some fun making a few cards. Happy crafting!


Monday, April 1, 2013

Here's lookin' at you....

 Today is scrapping the little things over at My Creative Time. Since it's April Fools Day, we were asked to do something silly, or pulling a prank, or something along that line. Well, my daughters had texted me these pics awhile back and I thought they would fit along the silly theme. So, here's my double page spread in my Smashbook.


Aren't they silly? I tell you, these little guys make me laugh every day! How cute are those glasses? 


Girls first. So, for Miss Aleida's page, obviously pulled out the pinks in the photo. I used a mat from my Project Life collection and layered it under one corner. Added some faux stitching, put down a bit of Washi tape, and then added elements using MCT products. 


I love the big stamps that are in the Camera Shy stamp set. They are nice and chunky...and I like how Emma laid them out. This is one of the sentiments. I layered it and used dimensionals to pop it up. And of course had to call attention to my grand babies being so cool...lol!


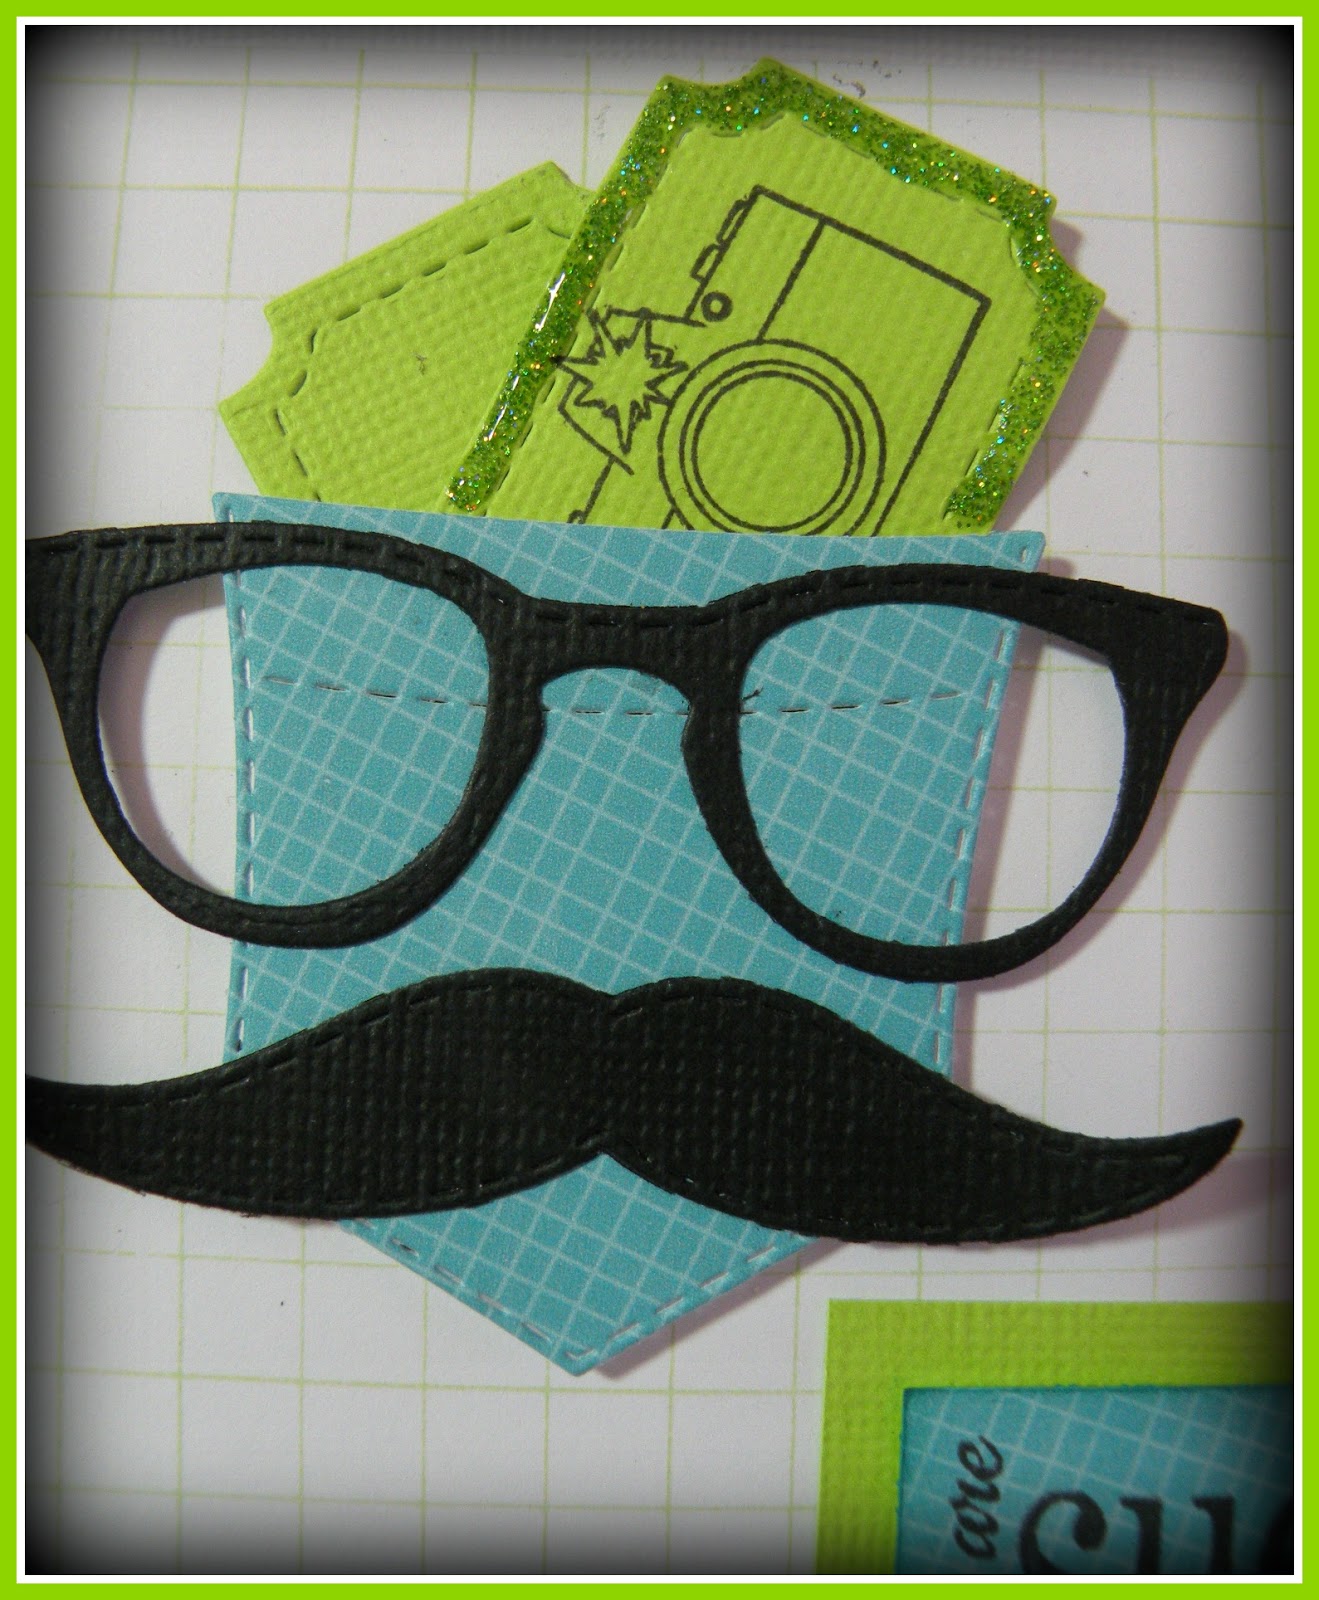
I used the pocket die from Fun Pockets stamp set and tucked a couple of the tickets coming out. Added the cheese and glasses and glittered them up a bit.


Now for Mr. Karson. He's such a honey! I tell you what, not a sweeter baby around! And...he is SUCH A HAM!!! For real! I tell, he just makes me laugh.
 
 
Again, I used a Project Life mat, layered and did some faux stitching. Put down more Washi tape, too. Cell pics didn't print the best, but at least I have them to cherish the memory years from now.


So, also from Camera Shy, I chose this sentiment for him....totally fits him to a tee! Popped it up with dimensionals as well. 


I again tucked in some ticket dies...one stamped with the camera from the same set. I added a mustache with his glasses....it's a guy thing...lol. Added a bit of glitter around the edge of the ticket.

Being Easter and all today, and a very busy weekend, this is the extent to which I had time...lol. I figured being my Smashbook, I can add my notes and doodles and more to it later if I choose. 

So, here's the list of supplies I used.


Get out some pics, a Smashbook or scrapbook, and save those memories! Time goes by so fast...I have more done of my grand babies than my own kids! The point is, I'm doing it now...and I hope one day they will appreciate it! Have fun, but at least get those pics and the stories with them someplace safe to look back at years down the road. You won't regret it...even if you're like me...starting a little late. Better late than never...as they say! Happy crafting!